How to Make a Seamless Multi-Post for Instagram?
Instagram is undoubtedly the most popular social platform for sharing photos and reels. However, the feature of uploading multiple posts in a single gallery has been there for a long time.
But if you are bored with that old-fashioned way of uploading a ton of photos, then this seamless multi-post will be an exciting thing for you. Let’s learn to make a seamless multi-post for Instagram, just like the post below,
Tools required to make a seamless multi-post for Instagram
It will help if you have Adobe Photoshop to make a seamless multi-post for Instagram. However, you can also use any other photo editing app to work with the layers in an Image to create a seamless post. But right now, I’m going to show you the steps in Adobe Photoshop 2019.
How to Make a Seamless Multi-Post for Instagram?
First, choose your desired image. For this purpose, I’m choosing a landscape image. You can choose landscape as well as portrait images. Make sure your image is ready before you begin to work. Once you have launched Adobe Photoshop on your computer, follow the steps below,
Step – 1: Click on Open to open the image from your drive.
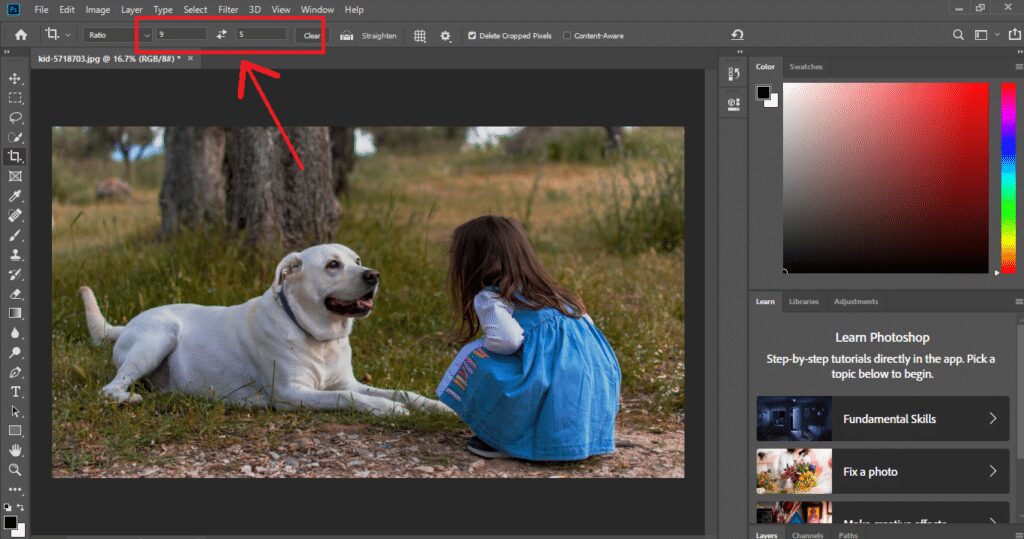
Step – 2: On the left sidebar of your Adobe Photoshop, click on the Crop Tool and select Ratio from the dropdown menu in the top bar.
Step – 3: Now set the “9 by 5” ratio for a landscape image. You can set the ratio as “2 by 1” if you want to upload it as a square image.

Note: For this purpose, I’m going to use a landscape image, and I set the ratio as 9 by 5.
Step – 4: You’ll see the cropping structure in your image. Crop the image, and click on the tick button in the top-right corner once it’s done.
Step – 5: Click “View” from the top menu and choose “New Guide Layouts.”
Step – 6: After clicking “New Guide Layouts,” a small pop-up window will open.
Step – 7: Click on columns, set the “Number” as 2 (or if it is already assigned to 2, then leave it as it is), set the “Gutter” as 0, and then click OK.
Step – 8: Now, go to the “Slice Tool.” You will find it in the “Crop Tool section.” If it is not showing, right-click on Crop Tool and select the Slice tool. Click on it.
Step – 9: Now, from the top bar, click “Slices From Guides.”
Step – 10: Now you need to save the file. To use your image for this purpose, you’ve to save it differently. Go to “File,” and Click on “Export”
Step – 11: Choose “Save as Web for Legacy”
Step – 12: From the following pop-up menu, choose JPEG (you can select the image and quality based on your preferences)
Step – 13:And after that, click on “Save”
Step – 14: Choose the desired location and save the file on your computer. It will automatically create a folder with two images. If the steps mentioned above puzzled you, this screen recording might help you understand.
Now you will see that the image is split into two in that folder. Take those two images on your phone. Then, upload these images on your Instagram by selecting them in the correct order. You can upload multiple photos on the same post, selecting them altogether.
Wrapping up:
This is how you can make a seamless multi-post for Instagram very quickly. This process might be tricky if you’re using Adobe Photoshop for the first time. However, if you know to work in Photoshop, creating such images for your next Instagram posts will not be that challenging.
Nevertheless, the video guide will help you out if you are stuck at some point. I hope it will help you make a seamless multi-post for Instagram quickly.
Read related:

